Film Recreation Project
An interesting endeavor to tackle, this page will run you down my process of accomplishing this project step by step.
The requirements was to take the picture on our own and seamlessly place our CGI models in that image. It had to match the film as best as possible and also maintain the authenticity of the shot, and, needless to say, look as believable as possible. First thing I knew I needed to do was set up the scene and estimate the camera lens as best I could. This step is necessary as it makes it much easier when its time place my object into the photo. The shot I'll recreate is an abandoned hut in open land from a good ol' Charlie Chapman movie.

Because 90 degree angles are perfect (luckily houses are built on them), I first placed a cube roughly lined up with the images composition. If Lining up the cube with the image without distorting the cube and ONLY changing the camera was a useful technique in estimating the camera lens of the shot. Then I would set the camera lens, move the camera, set the camera lens, move the camera, and so forth. I had an educated guess from previous knowledge of cameras and image viewing that this image was shot around 40 - 50 mm based on how compressed it is. Any shorter lens would make the perspective lines more dramatic. So, I started there. After some trial and error, 50 mm seemed to be the most accurate. Great! Now I have a place-holder to build onto.


I forgot to mention that this object also needed to be modeled in nurbs. A challenge indeed. Looking at the image, the hut is made out of wooden planks all over. Essentially that's just beveled cubes. There was no easy way to bevel in nurbs (or at least I didn't find out there was until after I started) so my technique was a bit unorthodox but effective.

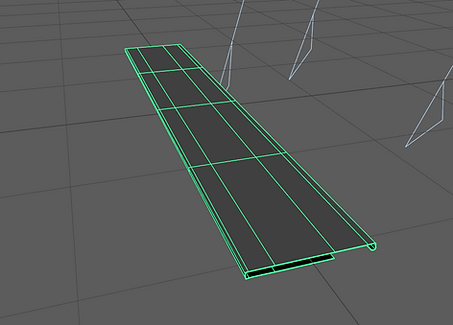
In the image above, you will see my set up for making a plank. I populated straight curves in such a frame that when lofted or melded together it would spawn a beveled surface. After a couple hours of figuring out this daunting puzzle, I find there's a simple button just for beveling a shape. Hey, I learned a lot so no regrets.
After that, making the actual hut was quite simple. I placed each plank in its place according to my placeholder and the film. Eventually, the hut emerged and I have my hut in basic form but more needs to be done to it.


Further modeling detail was added by slighting widening gaps between the planks in various places and adding dents and chips to the wood.


The good thing about nurbs is that you don't need high amounts of surface geometry to get detail. If this all in polygons, my computer would have a hard time keeping up. Its tricky to learn but highly efficient.


Now its time to test compositing and lighting. Finding a backplate (top photo) to take ended up not being too difficult especially since it was just land I was trying to capture. If the perspective was off it would at least be forgiving since there is nothing to compare the perspective to. Its a good thing I tested the camera lens! Now I know exactly what lens to take my photo and the perspective will inevitably line up. Light direction wasn't hard to get down but the shadows ended up way to dark. Compositing techniques discovered to integrate the rendered hut better were overlaying a little grass on top of the hut image so it doesn't seem like it is floating and also adjust values and contact shadows. The perspective seems to be pretty spot on though. A film grain overlay was added to see if that added to the image
Once modeling was done it was time to texture. In order to minimize workload and memory, I only textured 6 planks. That was enough variation so that all I needed to do was slap different materials in different places. I could slightly variate it a little more in maya with simple darkening or rotation of the textures.
The viewport looks messy but all the textures are applied. You will see the node tree and materials in Renderman that I set up. All of these materials are slight variations of the same tree to avoid repetition as much as possible.


An area light was put at the front of the house to soften the shadows in the front. The right side is to remain dark as the film. Once rendered, there were two images I needed to composite onto my photo, the hut alpha and my backplate. Luckily I don't need a contact shadow because the grass will be covering it.


Tada!! The final composite. This project was very hard but worth it in the end I feel. I learned a lot about integration, straying away from the "CG feel", and nurb modeling.